Applying and Using Plastic Mulch Film for Gardens and Raised Beds
Applying and Using Plastic Mulch Film for Gardens and Raised Beds
In our gardens we have used plastic mulch film for many years and love it. It is a terrific weed barrier, which we have not been able to tame our Bermuda Grass or the Bind Weed that sprouts up through the planting holes, but we try to keep it to a minimum, and the plastic mulch film does help with that.
Many people don’t like to use the plastic mulch film because it is, after all plastic. However, it is the ONLY way we can keep the previously mentioned problematic situations under control for us. We purchased our huge roll of black plastic mulch film several years ago from Peaceful Valley Farm Supply: www.groworganic.com, and it will likely last us “until the second coming”, as my grandma used to say.
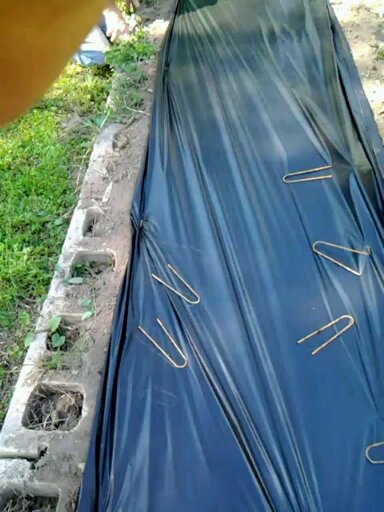
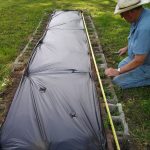
We no longer plant directly in the ground, as we built raised beds, but when we did plant directly in the ground, we used the black plastic mulch film over all the growing areas. We always till the ground or the soil in our raised beds just to loosen it up and go over it with a garden rake to remove hard dirt clods or rocks. Living in the Missouri Ozarks, we are well blessed with rocks. We then measure the raised bed we need to cover and measure what we need off the big roll and cut it. The roll is wider than the width of our raised beds, so we turn the excess under and fasten the plastic mulch film down with ground staples about every 12 – 18-inches, also purchased through Peaceful Valley Farm Supply.
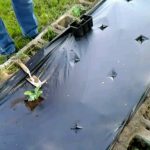
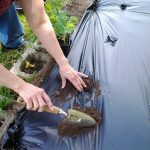
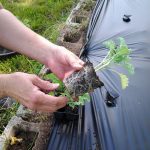
Now, the mulch film is down so it’s time to plant the plants we have either purchased or raised ourselves. Depending on the amount of space each variety of plants need, we measure that amount and cut an “X” at that spot making sure to allow enough room to insert a narrow tile spade or small shovel through the hole for deeper plants and dig out a hole deep enough for the plant’s root ball to go down so the plant is at ground level, then use the soil we removed from the hole to cover the area around the plant. For plants still in small cell packs, we use a small garden trowel since those plants do not need to be planted too deep.
When we plant our tomato plants, we use the same techniques, only we go ahead and place our homemade tomato cages over the plants for immediate protection from the wind, birds, squirrels, and deer tromping through the raised beds. I will cover how we make our tomato cages in another post.
We experimented with great success last year, with using the plastic mulching film to line the soil area on either side of our green beans we direct sowed in a raised bed. We cut the length of mulch film needed for the bed, then cut it in thirds to have three strips of film, since we needed a strip for each outside edge of the bean plants and one for the area between the two rows. We waited until the beans were up tall enough to see down the rows then applied and stapled the strips of plastic mulch film. It cut down tremendously having to hoe and pull any weeds that normally come up. Other times we have used straw on the planted areas and that also keeps the beans from having any mud and soil splashed on them during rain or watering periods.
After the plastic mulch film is down and the plants are in the soil, we begin setting up the automatic drip watering system, which I will cover in another blog post. However, if you plan to use straw or an organic type of mulch for your garden beds or fields, you will need to get the automatic drip watering system set up before applying the organic material so your waterers will be underneath it. It will be too difficult to do after applying that material because you want your plants to get the water, not the mulch.
Remember: Knowledge IS Power!

Recent Comments